

Microblading treatment is always top of the trend in the fashion world. Women, especially models and actresses, are crazy about microbladed brows. It’s a form of cosmetic tattooing that fills in the gaps between your brows. It aims to make your brows appear fuller and thicker. However, the outcome does not appear right away. You must go through the healing process and adhere to all recommended aftercare directions as closely as possible in order to obtain the desired result. The microblading healing stage before and after the result will shock you!!
Microblading Healing Stages

The microblading healing stage process can be physically and emotionally taxing. As a result, it’s important to get yourself ready and educated about what you could face during your healing process. This allows you to take decisive action and deal with the situation without feeling panicked. It’s also crucial to understand how to care for your microbladed area when it’s healing to prevent any complications.
In this article, we will let you know all the ins and outs of the microblading healing processes and aftercare tips:
Microblading Treatment
Microblading is a semi-permanent makeup procedure that resembles eyebrow tattooing but is much more advanced. The procedure is also known as:
- 3-D eyebrow embroidery
micro stroking
semi-permanent makeup
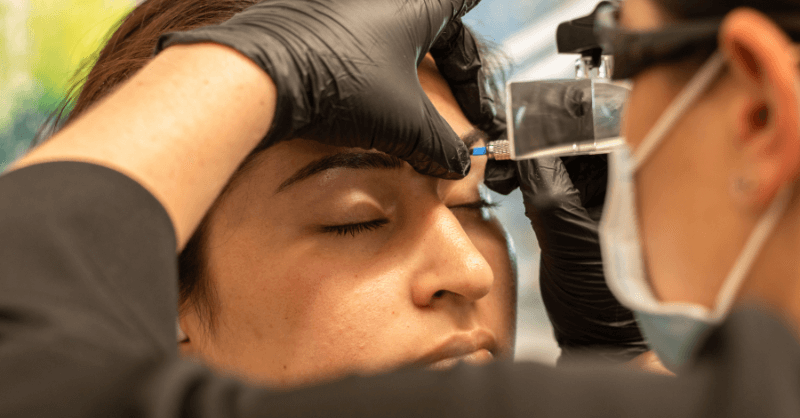
It’s done by hand, using a microblading tool (a blade made up of 10-12 tiny needles) to create thin incisions on the skin’s surface that mimic the length, thickness, and shape of natural hairs. Special pigments in the colour of natural hairs are then deposited into the skin, giving the appearance of thicker arches with a modified form that better matches your face shape. The results are very realistic and almost unidentifiable.
Healing Stages of Microblading
If this is your first time having your brows microbladed, be sure to ask your artist any questions or concerns you might have. They will clarify what will happen to your skin when it heals and provide microblading aftercare advice.
Usually, there are 7 Healing Stages in Microblading:
Swollen and Fuller Brows (Days 1 to 3)
This stage will last from the first to the third day following the operation. Your brows can appear very bold and full at this time. But don’t get too worked up about it because it will pass.
You’ll likely experience:
redness
tenderness
mild swelling
mild bleeding
a sensation of feeling cut or bruised
But on day 2 or 3, the mentioned side effects should fade away with time.
1. Very Dark Eyebrow and Flaking (Days 3 to 5)
Your brows will darken and thicken from days 3 to 5. They’ll remain the same for the next five days, but they’ll start to scab. Itching and flaking in the microbladed region are possible side effects. When this happens, there’s nothing to be concerned about because it’s completely natural. It simply means that your skin is adapting to the treatment and healing.
2. Discolouration and More Flaking of the Eyebrows (Days 5 to 8)
In your brows, expect more flaking, scabbing, and peeling. You don’t have to do anything right now. Allow the scabbing to flake out on its own. If you pick the scabs, you risk reopening the wounds and disrupting your skin’s natural healing process. You may also get rid of certain pigments that cause patchy eyebrows. Allow your skin to breathe naturally to avoid this unwelcome case.
3. Flaking ends and colour returns ( Days 8 to 12)
After the first week, the flaking will gradually stop. The color will also return.
Online Brow Lifting and Microblading Course
4. Looking Natural of the Colour and Texture ( Days 12 to 21)
This stage occurs between days 12 and 21 after treatment. The colour and texture of your brows should be more natural while remaining consistent. Each hair stroke may also appear more established. This will give the impression of feathery brows.
5. Healed Skin ( Days 21 to 30)
After one month, the skin would be totally healed. You should not be in any discomfort or pain right now. Your brows should be full and soft as well. When the healing process is completed, the end result will undoubtedly seem to be worthwhile.
You could have a follow-up appointment with your artist in the next month or two. This allows them to examine the healed skin and, if necessary, treat any spots.
6. Touch up ( 4 to 8 weeks)
After the final touch up session, the healing period is finally over. Some brows heal faster; some take more time. It depends on your age, skin type, overall health, and daily routine and lifestyle. After a touch-up, your brows will take their final shape and colour.
Microblading Touch Up
Touch-up would include applying colour to the brows’ outline that you already have. Microbladed brows should be touched up at least once a year, according to most technicians.
After your skin has completely healed, you can take care of it to protect your microblading investment. Applying sunscreen to the microbladed area can aid in fading prevention. Microblading, like other cosmetic procedures such as brow tattooing, is permanent but can fade with time. Due to the smaller amount of pigment used, fading can occur more quickly than with brow tattooing.
Microblading Healing After a Touch-Up
You’ll need touch-ups after your initial microblading session to keep your brows in form, colour, and definition.
Touch-ups should be done every 12 to 18 months, on average. However, the best frequency is determined by your desired appearance. It also depends on how well the pigment adheres to your skin. The pigment can fade quickly for some people, necessitating more frequent touch-ups.
A touch-up is exactly the same technique as the first session but on a smaller scale. It is only performed on a few parts of the brow rather than the entire brow. You should expect a similar healing method, but some people claim that touch-ups take less time to heal.
Skincare after microblading
Taking care of the area of skin where microblading was done is similar to taking care of a tattoo, though a little more intense. The colour will appear dark right after the treatment, and the skin underneath will be red. After microblading, wipe the area with a wet cotton swab dipped in sterilized water about two hours later. Any excess dye on your brows will be removed with this method. It will also maintain sterility in the environment. It can take anywhere from 7 to 14 days for the skin to appear healed and the pigment to fade to its normal shade.
To properly care for your skin after microblading, follow these steps:
For up to 10 days, avoid making the area wet, which involves keeping the face dry while showering.
Wash your face gently and be especially careful around the treated area. Pat it with a clean tissue. Don’t rub your brows.
Use only products prescribed by your esthetician.
Don’t use skincare products on your own because they can contain ingredients such as exfoliants and acids, which can affect the pigment.
Don’t sleep on your face, and use a clean pillowcase, ideally a silk one.
For at least a week, refrain from wearing makeup. Since the pigments are already settling into the shallow cuts in your skin created by blading, this is happening.
Picking at scabs, tugging, or itching the brow region are all bad ideas.
Saunas, swimming, and unnecessary sweating should be avoided before the region has healed fully and you have a follow-up appointment.
Maintain a clean brow line by keeping your hair away from it.
As instructed, apply any medicated cream or healing balm offered by your technician.
Avoid sun exposure and tanning.
Types of Microblading Aftercare
After microblading, you should treat your brows in one of two ways: dry healing or wet healing.
If your artist suggests wet healing, you can gently wash your brows with sterile water first. After that, blot them with a clean cloth or cotton pad to dry them slowly. Applying an ointment is the final move. This healing method is recommended by some microblading artists, who demonstrate that an ointment acts as a shield against infection, impacts the cells, and aids in the healing process.
When it comes to dry healing, you can choose between two options. The first involves gently cleaning and drying your brows, but no ointment is used. The second is a little more serious, requiring no washing and no ointments at all. All you have to do now is avoid water and wait for your brows to recover on their own.
Based on your skin condition, your esthetician will know which type of healing is best for you. Reports and comments on the internet can be perplexing. Some people recommend washing the brows and applying the ointment, while others advocate for dry healing. If the artist has enough experience, they should be able to figure out which approach works best for the client and recommend it. You should adhere to their guidelines in the letter.
Potential Side Effects of Microblading
- Swollen eyebrows
- To dark eyebrows
- Itchiness
- Scabbing
- Quick pigment fading (oily skin)
- Irritations
- Infections
- Allergy
Tips to Persist the Healing Period
- Tip 1: Make sure you don’t have anything urgent coming up in the next month before scheduling a microblading appointment. If an unwelcome celebration occurs when you are still recovering, you will most likely have to deal with scabbing and swollen brows. So, when scheduling your microblading appointment, keep in mind that your brows will not be at their best for a few weeks afterwards.
- Tip 2: Spending less time in front of the mirror is a good idea. If you’re obsessive with your brows, you may want to check them every few minutes. It takes a long time for the colour to change. The redness fades with time. Instead, do something else. Read a book, turn on the television, and try not to think about them.
- Tip 3: Don’t be alarmed by scabbing. You should be concerned that you will rip off scabs while sleeping or by mistake, but don’t be. If something similar occurs, contact your microblading artist.
- Tip 4: Some people take longer to recover than others, so don’t be discouraged if you’re one of them. Don’t equate yourself to other people whose brows healed faster. Consider how lovely you’ll look in the future with your new brows. If you follow these tips and processes, and if the microblading artist did a decent job, you’ll be in love with your new brows. They’ll boost your self-esteem to new heights!!!
Conclusion
In conclusion, eyebrow enhancement with microblading is a cosmetic technique that can give your brows a fuller, thicker appearance. It is imperative to acknowledge that the process of mending may entail multiple stages and require as much as thirty days. Make sure to speak with a trained expert before getting microblading, and carefully follow their aftercare recommendations if you decide to proceed. Enjoy gorgeous, natural-looking eyebrows for up to eighteen months with the right maintenance.
Frequently Asked Questions (FAQ)
No, you should not pick at the scabs after microblading. Picking at them can disrupt the healing process and lead to scarring or infection.
The color of your microbladed eyebrows may appear very dark at first. This will lighten up within the first 10 to 14 days as your skin heals.
Microblading is a semi-permanent makeup procedure that resembles eyebrow tattooing but is much more advanced. It is also known as 3-D eyebrow embroidery, micro stroking, and semi-permanent makeup.
The eyebrow microblading healing process typically takes 25 to 30 days. However, the rate at which your skin heals can vary slightly from person to person.
There are generally 7 stages of microblading healing:
Swollen and Fuller Brows (Days 1 to 3)
Very Dark Eyebrow and Flaking (Days 3 to 5)
Discolouration and More Flaking of the Eyebrows (Days 5 to 8)
Flaking ends and colour returns (Days 8 to 12)
Looking Natural of the Colour and Texture (Days 12 to 21)
Healed Skin (Days 21 to 30)
Touch up (4 to 8 weeks)
 " alt="Microdermabrasion Training: What to Expect & How to Get Certified" />
 " alt="Permanent Makeup: A Step-by-Step Guide to Starting Your Career" />
 " alt="Skincare Specialist Salary: How Much Can You Earn in 2025?" />